Ultimate Earl Grey Cake Recipe: Moist, Flavorful & Easy to Bake with Blueberry Filling
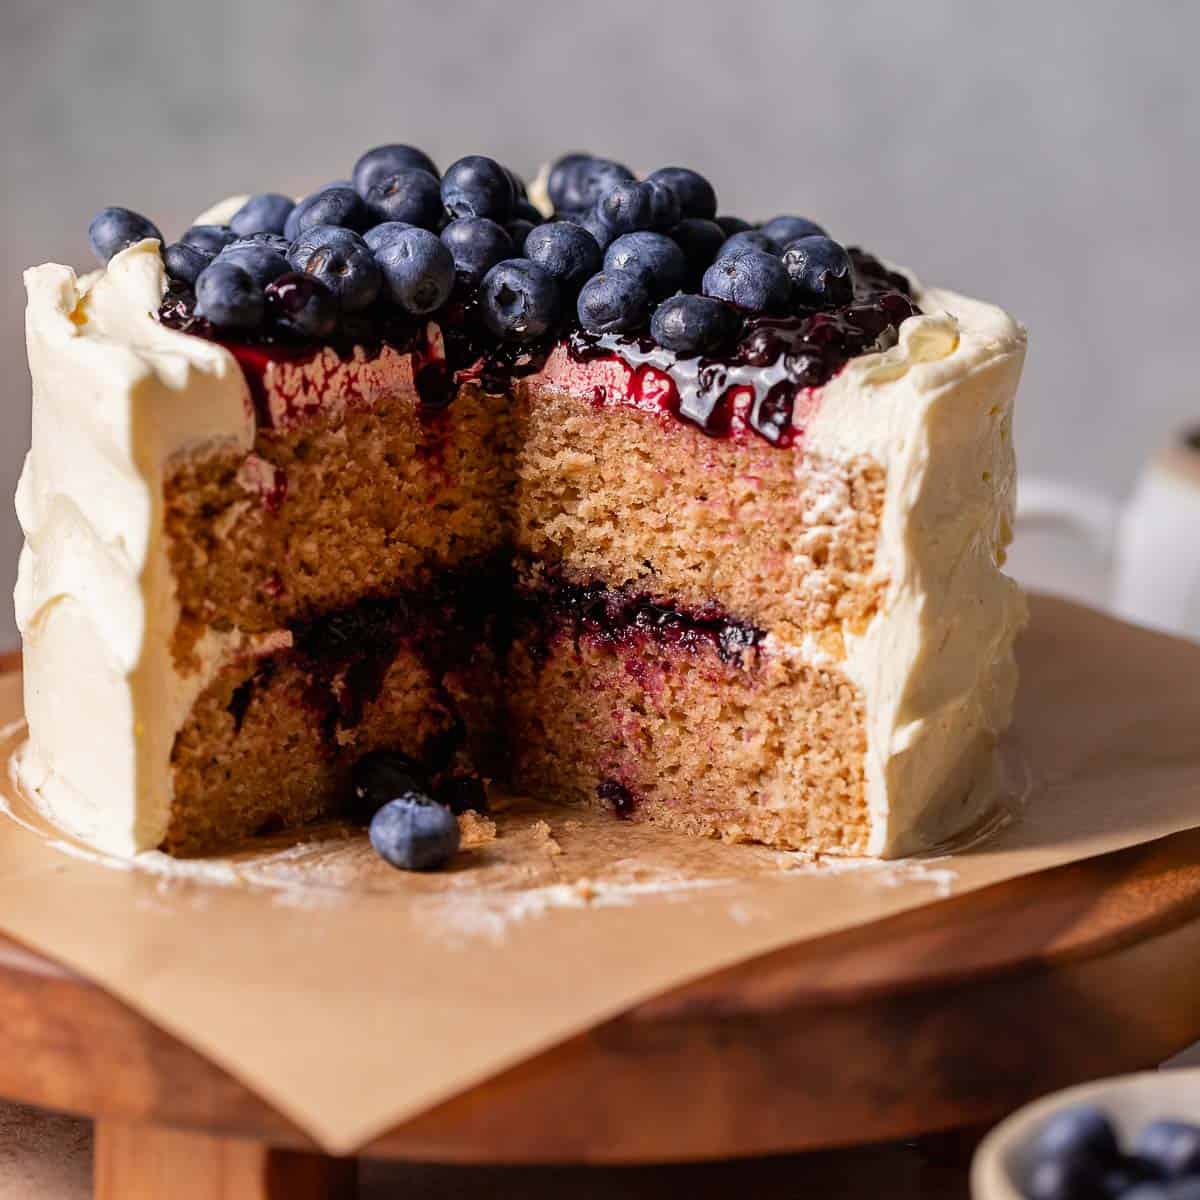
Transform your cherished cup of Earl Grey tea into an absolutely breathtaking dessert with this exquisite Earl Grey cake recipe. This two-layer masterpiece is deeply infused with the distinctive aromatic notes of Earl Grey tea, perfectly complemented by a vibrant, fruity homemade blueberry filling, and elegantly crowned with a rich, creamy vanilla bean frosting. Prepare to impress with a cake that truly captures the essence of sophisticated tea time in every bite.
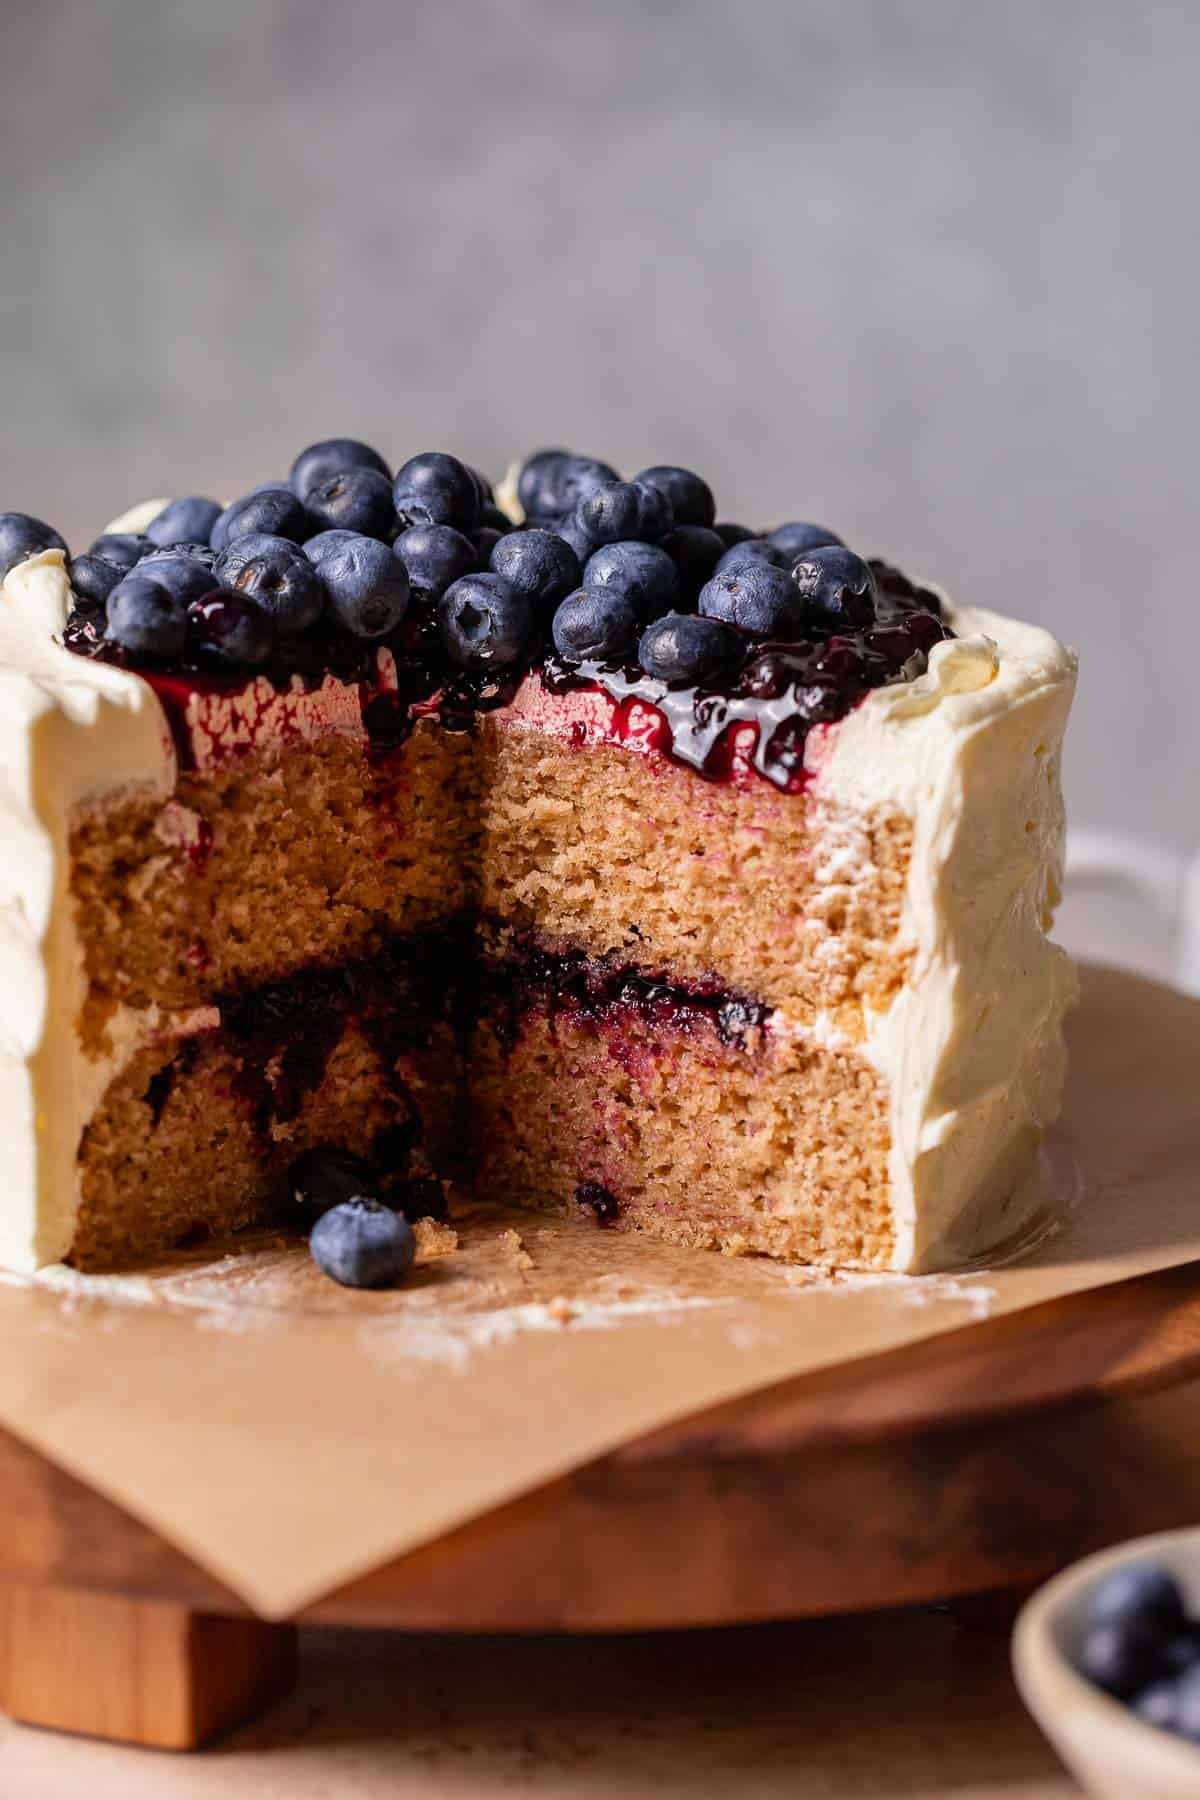
As a pastry chef, I am continuously driven to explore and create cakes with truly distinctive and memorable flavors. This particular Earl Grey cake recipe was directly inspired by the comforting ritual of enjoying my favorite cup of tea. It is absolutely brimming with tea flavor, making it a unique indulgence for any occasion.
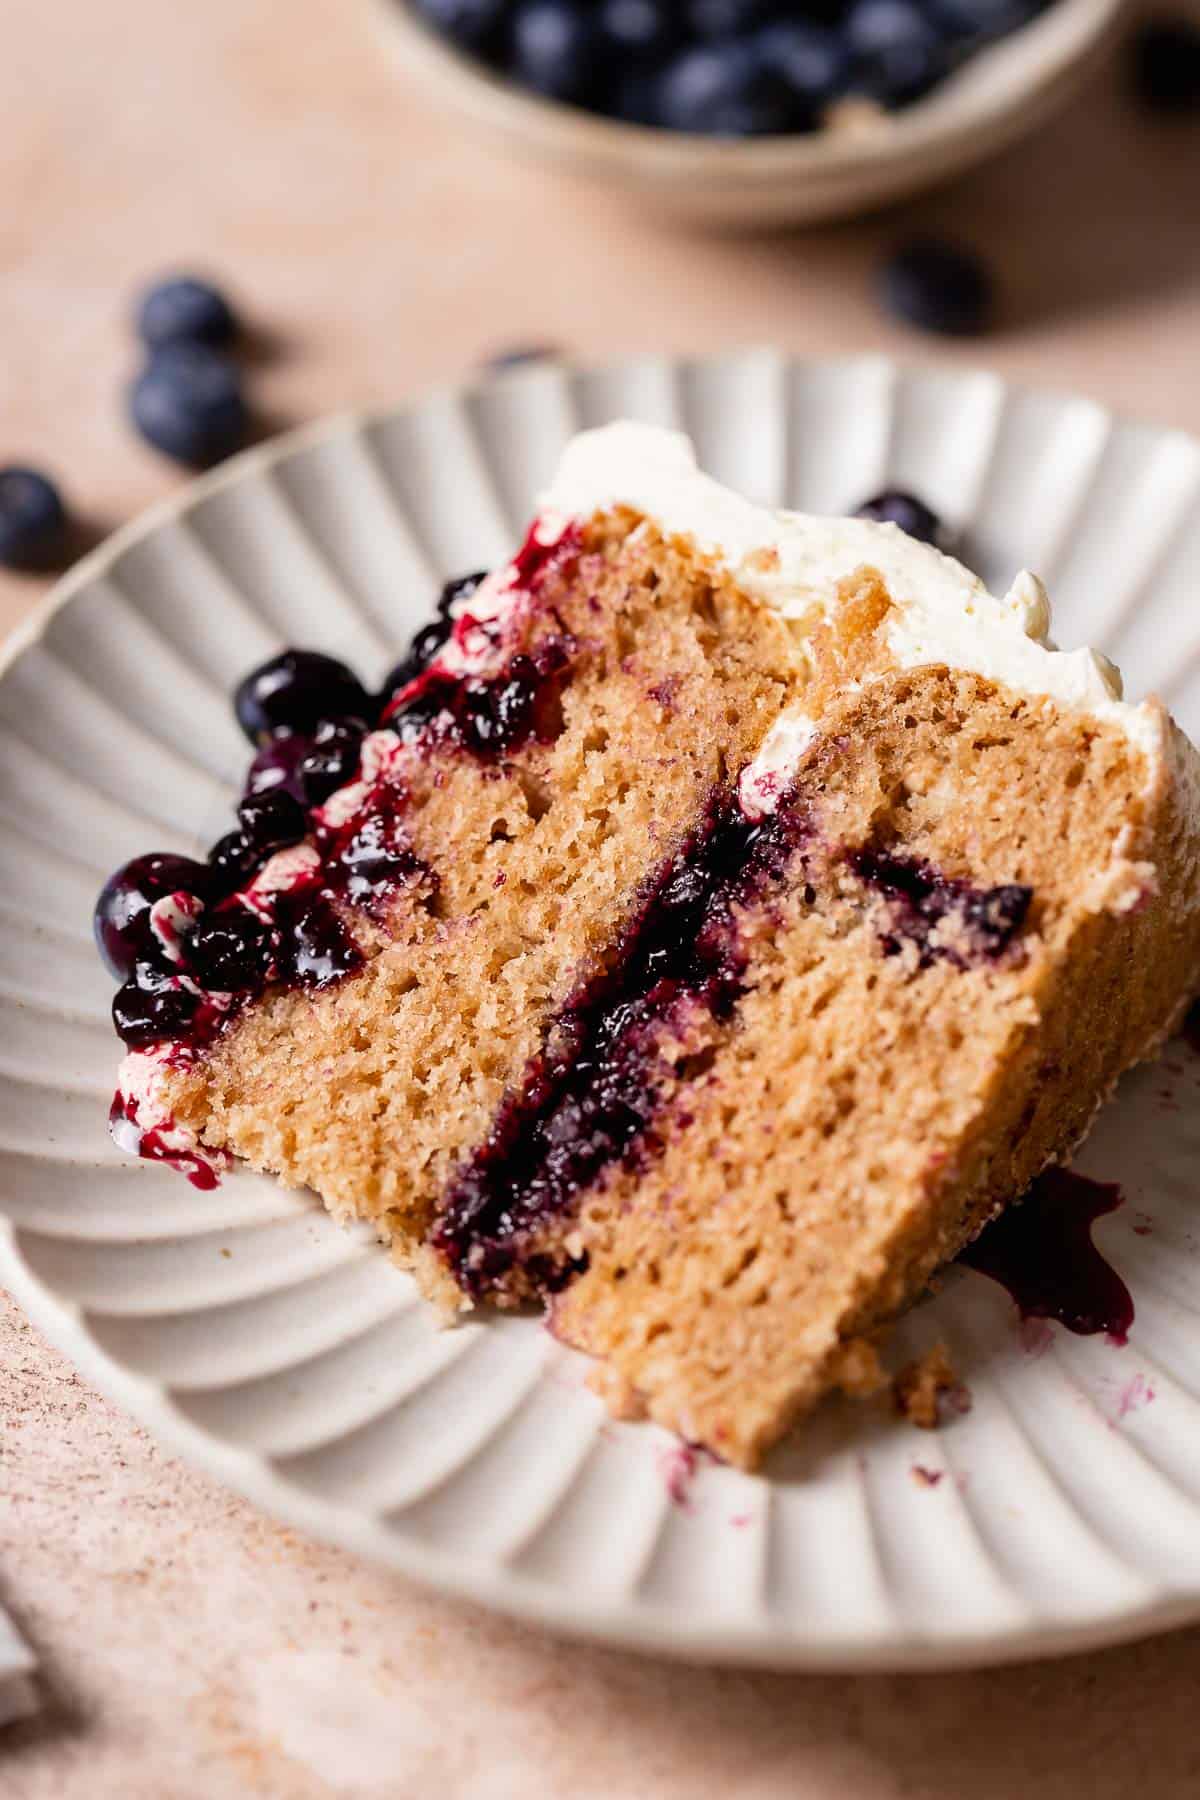
Each cake layer is meticulously soaked with a special tea-infused simple syrup, ensuring maximum moisture and intensifying the Earl Grey aroma throughout. These tender, flavorful layers are then generously filled with a luscious, homemade blueberry filling that adds a delightful tartness and vibrant color. The result is a cake that remains incredibly moist and profoundly flavorful for days, so much so that every guest will be convinced it’s a gourmet creation freshly delivered from a high-end bakery. It’s a perfect balance of floral, citrusy tea, sweet blueberries, and creamy vanilla.
Table of Contents
Tips for Achieving the Best Earl Grey Flavor
Infuse the milk thoroughly. For the most pronounced and authentic Earl Grey flavor, it’s crucial to steep the tea bags directly in warm milk. As the tea infuses, you’ll observe the milk gradually transforming into a beautiful, light milk chocolate color, indicating it’s ready to impart its rich essence to your cake batter.
Opt for quality tea bags over loose leaves. While loose leaf tea can be potent, tea bags are generally more accessible and significantly simplify the baking process, as they eliminate the need for straining tea leaves later. This ensures a smooth, consistent tea flavor without any unwanted texture.
Adjust tea strength to your preference. The beauty of this Earl Grey cake is its adaptability. If you’re a true connoisseur of strong Earl Grey, feel free to enhance the infusion by adding a few extra tea bags. For a more subtle, delicate tea flavor, using 2-3 bags will achieve a perfect balance. Don’t be afraid to experiment to find your ideal strength!
Brush with Earl Grey simple syrup for an extra boost. This is a professional baker’s secret I’ve consistently used in bakeries to infuse maximum flavor and moisture into cakes! The simple syrup is made by simmering tea-infused water and sugar until the sugar completely dissolves. Once cooled, this aromatic syrup is lightly brushed onto each cake layer. Not only does this technique deliver a more robust tea flavor, but it also remarkably keeps the cake wonderfully moist and fresh for several days!
Explore different Earl Grey varieties. The world of Earl Grey is vast and exciting! Don’t limit yourself to just one type. Consider experimenting with varieties like Lady Grey, which often includes orange and lemon peel; Red Earl Grey, a rooibos-based blend; or French Earl Grey, which may feature floral notes of rose and cornflower. Each variation offers a unique nuance to your cake.
Don’t forget the zest! For an even brighter burst of bergamot, consider adding a tiny pinch of fresh orange or lemon zest to your cake batter or even your buttercream. The essential oils in the zest will amplify the citrusy notes inherent in Earl Grey tea.
Ingredient Notes and Expert Substitutions

Earl Grey Tea: The beauty of this recipe lies in its flexibility when it comes to tea brands. I’ve personally tested several, and found that there isn’t one “right” tea brand to use. Whatever high-quality Earl Grey tea bags you have readily available in your pantry or at your local store will work perfectly. You’ll need at least 7 tea bags in total for both the cake batter and the simple syrup to achieve a robust flavor.
Butter: For a truly superior vanilla bean buttercream that rivals any professional bakery, I highly recommend using a high-quality, full-fat butter. Brands like Kerrygold or Plugra make an enormous difference, contributing to a richer flavor and a smoother, more stable frosting. The fat content and flavor profile of premium butter significantly elevate the overall taste and texture of your cake.
Cake Flour: This specific type of flour is absolutely essential and cannot be substituted without significantly altering the cake’s texture. We are employing the reverse creaming method for this recipe, which relies on the low-gluten content of cake flour to produce an incredibly tender, soft, and moist crumb. Substituting with all-purpose flour will result in a tougher, denser cake.
Blueberries: My top recommendation for the filling is frozen Wild Maine blueberries due to their intense, concentrated flavor and petite size. However, fresh blueberries can be successfully substituted; just ensure you add at least 1/2 cup more to the filling to achieve the same vibrant taste and volume, as fresh berries tend to have more water content.
Sour Cream: This humble ingredient is a key player in ensuring an exceptionally moist and tender cake. Its acidity helps tenderize the gluten, and its fat content contributes to a rich, soft crumb. If sour cream isn’t available, a full-fat plain Greek yogurt can be used as an effective substitute, offering similar moisture and tanginess.
Vanilla Extract/Bean Paste: While vanilla extract works well, using vanilla bean paste will elevate the flavor of your buttercream to new heights, adding those beautiful specks of vanilla bean and a deeper, more complex vanilla aroma. This small upgrade contributes significantly to the “bakery-style” quality.
Granulated Sugar: Crucial for both sweetness and structure in the cake, and for the simple syrup and blueberry filling. Do not reduce the amount unless you are very experienced in adjusting cake recipes, as it can affect texture.
Baking Powder & Salt: These leavening agents and flavor enhancers are vital. Baking powder provides the lift, while salt balances the sweetness and enhances all the other flavors. Always use fresh baking powder for optimal rise.
Step-by-Step Recipe Instructions
Step 1: Infuse the milk for maximum flavor. In a small saucepan, gently heat the milk with the Earl Grey tea bags over medium-low heat. This slow infusion process allows the bergamot oils to fully release, creating a wonderfully aromatic and flavorful milk. You’ll know it’s ready when the milk takes on a subtle milk chocolate hue. Once cooled to room temperature, carefully squeeze out any remaining milk from the tea bags before discarding them to capture every drop of flavor. (Image 1 below)
Step 2: Prepare the dry ingredients and butter using the reverse creaming method. In the bowl of a stand mixer fitted with the paddle attachment, combine all the dry ingredients: cake flour, granulated sugar, baking powder, and fine sea salt. Mix briefly to combine. Then, add the room-temperature unsalted butter and mix on low speed. The goal here is to coat the flour particles with fat, which inhibits gluten development, resulting in a super moist and tender cake crumb. Continue mixing until the mixture resembles coarse sand, typically about 3 minutes. (Image 2 below)
Step 3: Gently incorporate the wet ingredients. In a separate bowl, whisk together the infused tea milk, sour cream, vegetable oil, large egg, and vanilla extract until thoroughly combined. With the mixer on low speed, slowly pour this whisked wet mixture into the dry ingredients until just combined. Be careful not to overmix, as this can develop gluten and lead to a tough cake. The batter should have a tannish-brown color and be free of any visible pockets of dry flour. (Image 3 below)
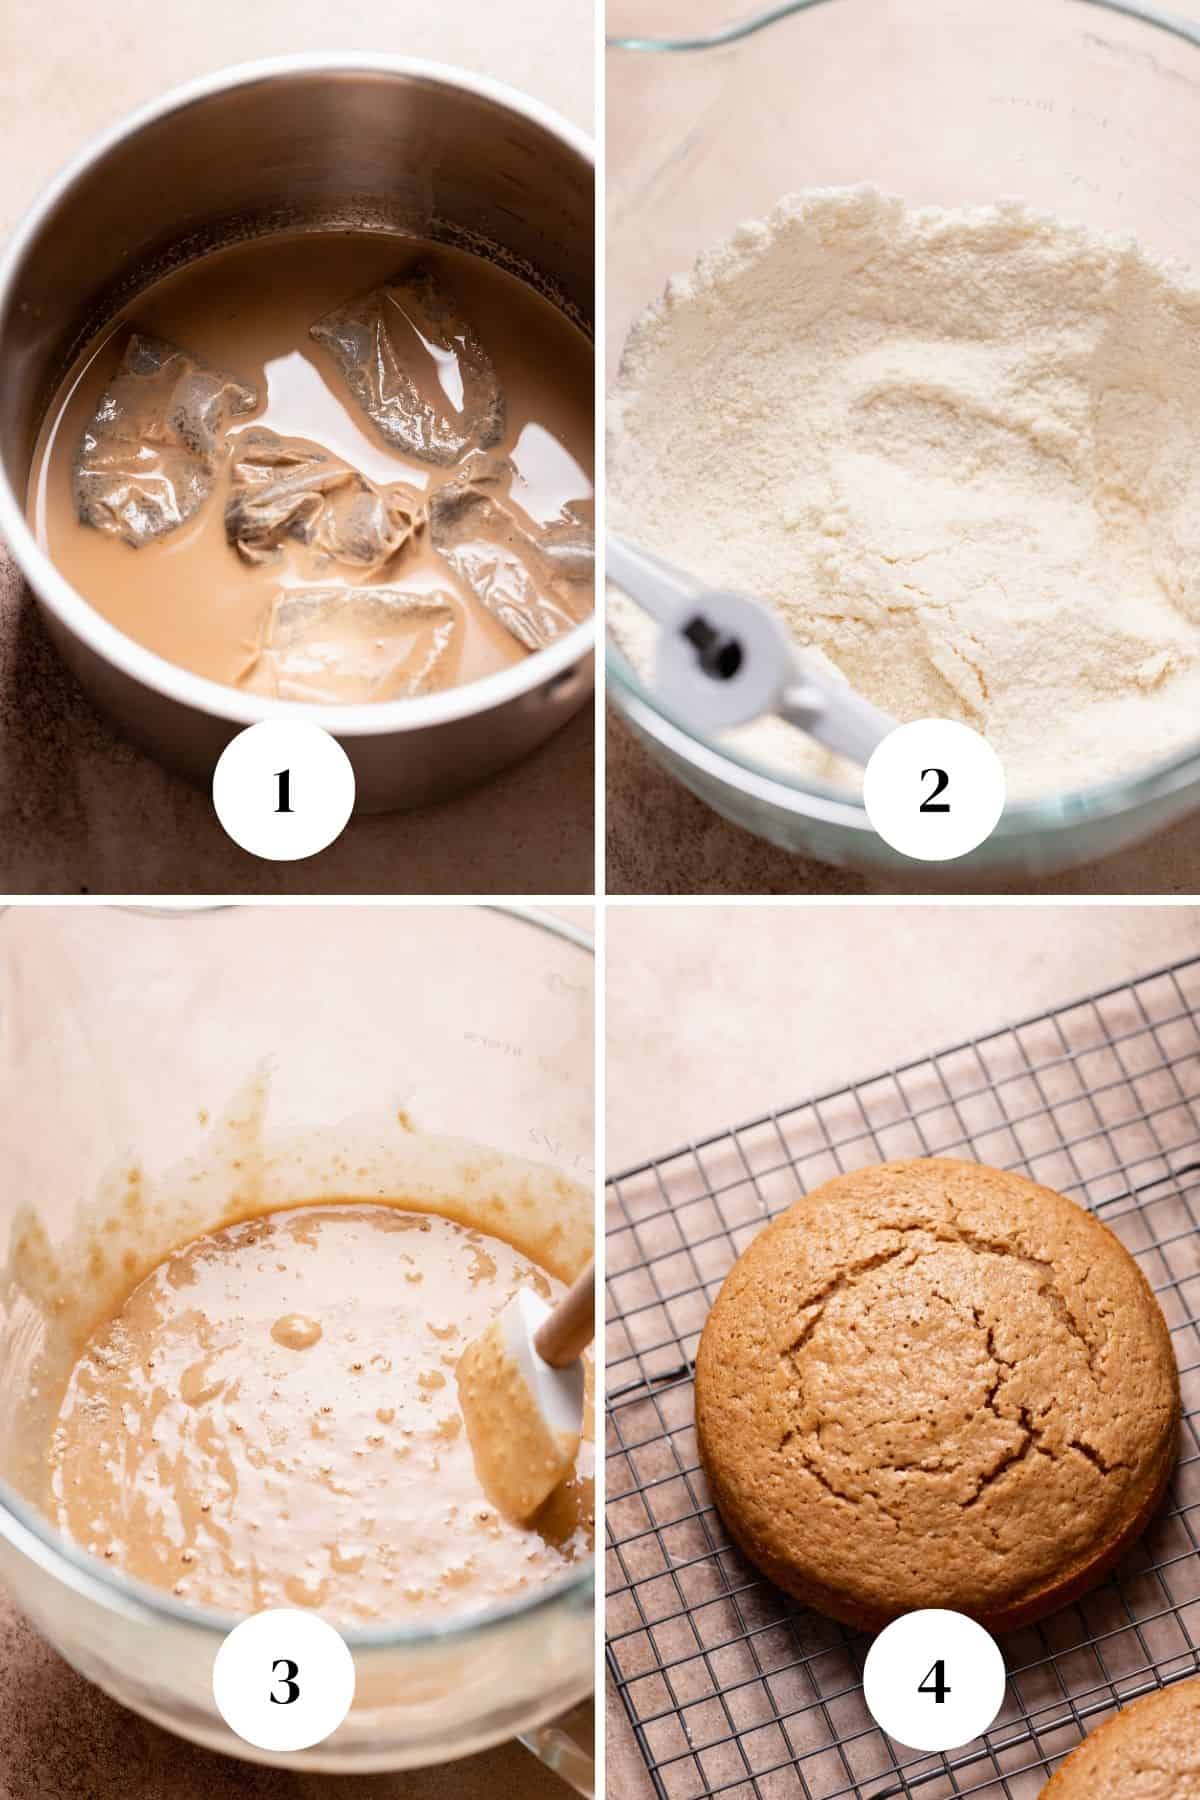
Step 4: Bake the perfectly portioned cake layers. Divide the cake batter evenly between your prepared cake pans. To ensure an even rise and prevent large air pockets, gently tap the pans several times on your counter to release any trapped air bubbles. Bake as directed until a toothpick inserted into the center comes out clean and the tops spring back when lightly touched. After baking, allow the cake layers to cool in their pans on a wire rack for 20 minutes before carefully inverting them to cool completely. (Image 4 above)
Step 5: Prepare the potent Earl Grey simple syrup. While the cakes cool, combine water, granulated sugar, and additional Earl Grey tea bags in a small saucepan. Heat this mixture over medium heat, stirring continuously until the sugar completely dissolves and the syrup visibly darkens from the tea’s infusion. This concentrated syrup is key to enhancing both flavor and moisture. Remove the tea bags once the syrup has cooled. (Image 5 below)
Step 6: Craft the luscious blueberry filling. In a separate saucepan, combine the blueberries, granulated sugar, and fresh lemon juice. Cook over medium heat, stirring occasionally, until the berries burst, release their juices, and the mixture begins to boil gently. In a small bowl, whisk together cornstarch and a small amount of water to create a slurry. Stir this slurry into the simmering blueberry mixture and continue to cook for another minute until it thickens to a jam-like consistency. Remove from heat and set aside to cool completely before using to prevent it from melting your frosting. (Image 6 below)
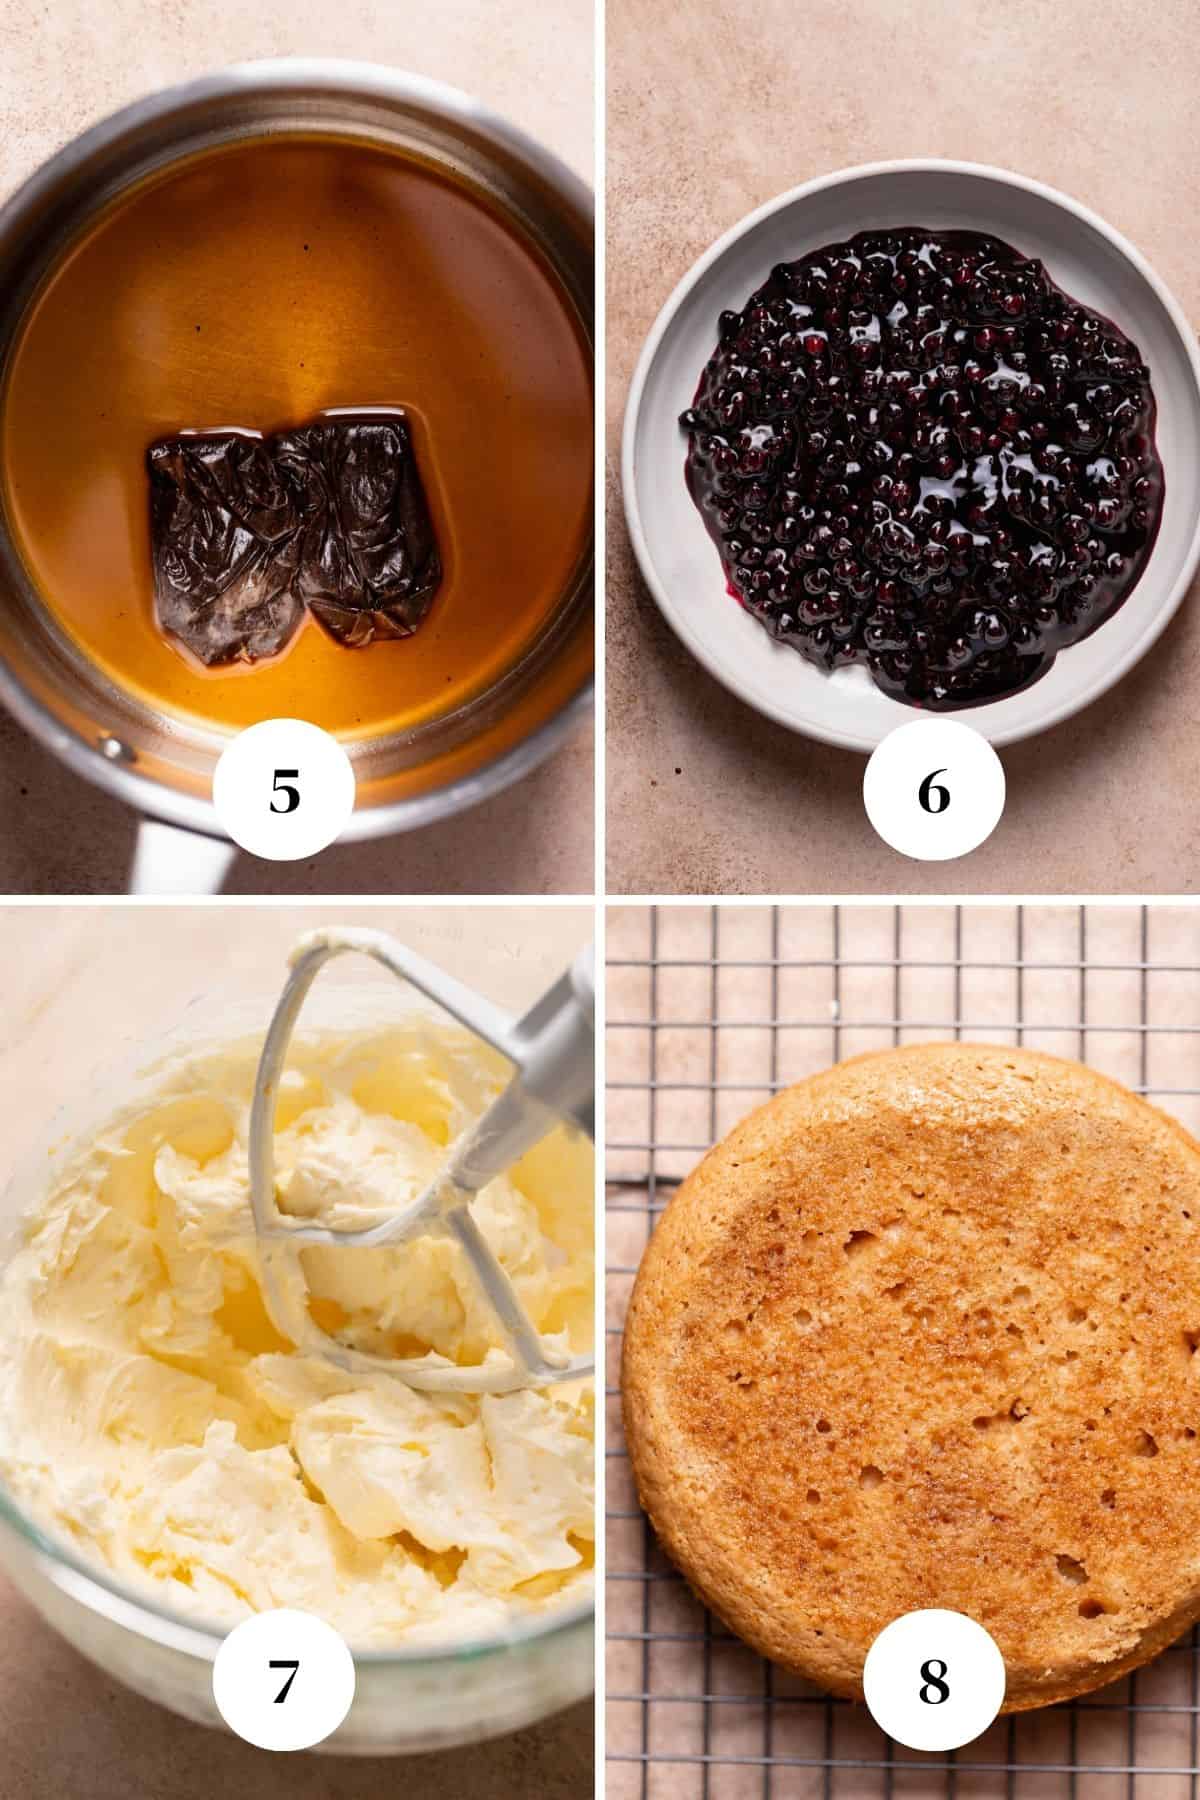
Step 7: Whip up the dreamy vanilla bean frosting. In a stand mixer with the paddle attachment, cream together the softened butter and powdered sugar until light and fluffy. Next, mix in the heavy cream and your choice of vanilla bean paste or vanilla extract. Continue beating on medium speed for an additional 2-3 minutes. This prolonged beating incorporates air, making the frosting incredibly white, light, and wonderfully fluffy, achieving that perfect, spreadable consistency. (Image 7 above)
Step 8: Soak the cake layers for ultimate moisture. Once the cake layers are completely cool, use a serrated knife to carefully trim a thin layer off the top of each cake to create a flat surface. This ensures a stable and professional-looking cake. Then, lightly brush each trimmed cake layer with approximately one tablespoon of the cooled Earl Grey simple syrup. Be careful not to over-saturate the cake; too much syrup can make the cake soggy. You will likely have some leftover syrup. (Image 8 above)

Step 9: Assemble the cake with its delicious filling. Place the first syrup-soaked cake layer onto your chosen serving platter or cake stand. Using a piping bag fitted with a round tip (or simply a Ziploc bag with the corner snipped), pipe a sturdy border of vanilla bean buttercream around the outer edge of the cake layer. This creates a dam that will effectively seal in the blueberry filling, preventing it from spilling out the sides. Then, generously fill the center with half of your cooled homemade blueberry filling. Carefully place the second cake layer on top, aligning it perfectly. (Image 9 above)
Step 10: Decorate and finish your masterpiece. Using an offset spatula, cover the entire cake – both the sides and the top – with the remaining vanilla bean frosting. For easier handling and a smoother finish, if your cake layers feel unstable or move excessively, chill the cake in the refrigerator for about 20 minutes before continuing to frost. Once frosted, spoon the remaining blueberry filling decoratively on top of the cake, creating a beautiful contrast, and garnish with fresh blueberries for an elegant and inviting presentation. (Image 10 above)
Professional Baking and Cake Assembly Tips
Embrace a kitchen scale. Baking with a digital kitchen scale is unequivocally my #1 baking tip for consistent and professional results! Measuring by weight (grams) rather than volume (cups) ensures extreme accuracy, which is paramount in baking where ingredient ratios are critical. If you don’t have a scale, at least use the spoon-and-level method for flour: first fluff the flour in its container, then gently spoon it into your measuring cup until overflowing, and finally level it off with a straight edge. Never scoop directly from the bag, as this compacts the flour and leads to too much flour being used.
Always cool the cake completely before frosting. Patience is a virtue in cake decorating! Attempting to frost cake layers that are even slightly warm is a common mistake. Warm cake will inevitably melt your beautifully whipped buttercream, leading to a runny, messy, and frustrating experience. Ensure your cake layers are completely cool to the touch, ideally at room temperature or even slightly chilled, for the best frosting results.
Serve at room temperature for optimal flavor and texture. While the cake is best stored in the refrigerator, its full flavor profile and tender texture truly shine when served at room temperature. The butter in the frosting and cake softens, allowing all the delicate Earl Grey and blueberry notes to come through. Remove your Earl Grey cake from the refrigerator at least 30 minutes, or even an hour, before you plan to serve it.
Don’t overmix the batter. Once you’ve added the wet ingredients to the dry, mix only until just combined. Overmixing develops gluten, which can lead to a dense, tough cake rather than the light, tender crumb we’re aiming for. A few lumps are perfectly fine!
Level your cake layers. For a neat and professional appearance, use a serrated knife or a dedicated cake leveler to trim any domed tops from your cake layers. This creates a flat surface for stacking, preventing your cake from leaning and ensuring even layers of frosting and filling.
Storage, Freezing, and Make-Ahead Options
Storage: To maintain its exquisite moisture and freshness, it is best to store this frosted Earl Grey cake in the refrigerator when not being served. Properly stored, it will remain delicious for approximately 4-5 days. If you don’t have an airtight cake container, you can gently press a piece of parchment paper or baking paper against any exposed cake crumb on cut slices to prevent it from drying out.
Freezing: This cake freezes beautifully! For longer storage, you can freeze the entire cake (unfrosted or frosted, though unfrosted layers are ideal), or individual slices. Wrap tightly in plastic wrap, then an additional layer of aluminum foil, and store in an airtight container for up to one month. When ready to enjoy, let it defrost slowly in the refrigerator overnight, or at room temperature for a few hours, before serving.
Make Ahead: Preparing elements of this cake in advance can significantly ease your baking day. The baked cake layers can be wrapped individually in plastic wrap and stored in the freezer for up to one month. Thaw in the refrigerator before assembly. Additionally, both the homemade blueberry filling and the Earl Grey simple syrup can be prepared up to one week in advance and stored separately in airtight containers in the refrigerator until you’re ready to use them.
Frequently Asked Questions (FAQs)
While not strictly required, the Earl Grey simple syrup is highly recommended. It serves a dual purpose: it significantly enhances the tea flavor throughout the cake, and more importantly, it helps keep the cake incredibly moist and fresh for days. Skipping it will still yield a tasty cake, but it won’t have the same depth of flavor or extended freshness.
Absolutely! If you prefer a pure Earl Grey and vanilla experience, feel free to omit the blueberry filling. In its place, you can fill the center with more of the vanilla bean buttercream. Please note that if you choose to do this, you will need to increase the buttercream recipe by 1.5x or even 2x to have enough to fill and frost the entire cake.
Earl Grey is a distinctive black tea primarily flavored with bergamot oil, derived from the peel of a bergamot orange. This gives it bright, citrusy notes reminiscent of lemon, grapefruit, and sometimes a hint of floral aroma, all layered over a robust black tea base. It’s a sophisticated and aromatic flavor profile that translates beautifully into baked goods.
This recipe is developed for two 6-inch cake pans. I have not personally tested it in a larger-sized pan. If you wish to use an 8-inch or 9-inch pan, you would generally need to at least double the recipe to ensure you have enough batter for adequate height, and baking times would also need to be adjusted accordingly. Always fill your pans about two-thirds full.
A dense cake is often caused by overmixing the batter, which develops too much gluten, or by not measuring your flour correctly (too much flour makes a dry cake). A dry cake can also result from overbaking. Ensure you follow the spoon-and-level method for flour or, ideally, use a kitchen scale for accuracy, and don’t bake past the point where a toothpick comes out clean.
More Delectable Fruity Cake Recipes
- Lemon Raspberry Cupcakes
- Deliciously Moist Lemon Poppy Seed Cake
- Decadent Lemon Bar Cake
- Tropical Mango Mousse Cake
If you tried this amazing Earl Grey cake recipe or any other delightful recipe on my website, I would absolutely love to hear about your experience! Please share how it went in the comments below. Your feedback truly brightens my day! Also, don’t forget to leave a star rating while you’re there to help other bakers discover this gem. You can also tag me on Instagram or Facebook so I can admire your beautiful creations!
Earl Grey Cake
Print Recipe
Save RecipeSaved!
Pin Recipe
Equipment
-
two 6 inch cake pans
Ingredients
Earl Grey Cake Batter
- 3/4 cup whole milk
- 5 Earl Grey tea bags, strings removed
- 1 1/2 cups cake flour, *See notes below for measuring*
- 3/4 cups granulated sugar
- 2 teaspoons baking powder
- 1/2 teaspoon fine sea salt
- 5 tablespoons unsalted butter, room temperature
- 1/2 cup sour cream, room temperature
- 1/3 cup vegetable oil
- 1 large egg, room temperature
- 1 teaspoon vanilla extract
Earl Grey Simple Syrup
- 1/4 cup water
- 1/8 cup granulated sugar
- 2 Earl Grey tea bags, strings removed
Blueberry Filling
- 1 1/2 cups frozen Wild Maine blueberries
- 3 tablespoons granulated sugar
- 1 teaspoon lemon juice
- 2 teaspoons water
- 1 teaspoon cornstarch
Vanilla Bean Buttercream
- 1 cup unsalted butter, room temperature
- 1 1/2 cups powdered sugar
- 2 tablespoons heavy cream
- 2 teaspoons vanilla extract
- Fresh blueberries, for decorating
Instructions
-
Steep the tea bags in milk over medium-low heat until the milk turns brown, about 6-8 minutes. Once cool, remove the tea bags, squeezing out any excess milk. You should have 1/2 cup (115g) of milk. Adjust with more regular milk if needed.3/4 cup (172 g) whole milk, 5 Earl Grey tea bags
-
Preheat the oven to 350 F/177 C. Grease the sides of two 6-inch cake pans and line the bottoms with parchment paper.
-
In a stand mixing bowl, combine the flour, sugar, baking powder, and salt. Then mix in the butter on low speed until it resembles coarse sand, 3 minutes.1 1/2 cups (175 g) cake flour, 3/4 cups (150 g) granulated sugar, 2 teaspoons baking powder, 1/2 teaspoon fine sea salt, 5 tablespoons (70 g) unsalted butter
-
Whisk together the tea milk, sour cream, oil, egg, and vanilla. Mix it into the dry ingredients until just combined.1/2 cup (113 g) sour cream, 1/3 cup (65 g) vegetable oil, 1 (50 g) large egg, 1 teaspoon vanilla extract
-
Evenly distribute the batter into the prepared cake pans (370 grams in each). Bake for 25-30 minutes or until the tops spring back when touched. Allow the pans to cool on a wire rack for 20 minutes, then remove them from the pans and let them finish cooling on the rack.
-
Meanwhile, make the simple syrup. Cook the water, sugar, and tea bags over medium heat for 3-4 minutes or until the sugar is dissolved and the syrup is tea-colored. Set aside. Remove the tea bags once cool.1/4 cup (56 g) water, 1/8 cup (30 g) granulated sugar, 2 Earl Grey tea bags
-
Cook the blueberries, sugar, and lemon juice over medium heat until bubbling, about 10-15 minutes. Mix the cornstarch and water, stir into berries, and cook for 1 more minute until thickened. Cool before using.1 1/2 cups (140 g) frozen Wild Maine blueberries, 3 tablespoons (45 g) granulated sugar, 2 teaspoons water, 1 teaspoon cornstarch, 1 teaspoon lemon juice
-
For the frosting, cream the butter and powdered sugar until combined. Then mix in the cream and vanilla. Beat on medium speed for 2-3 minutes until the frosting is super light, white in color, and fluffy.1 cup (226 g) unsalted butter, 1 1/2 cups (180 g) powdered sugar, 2 tablespoons heavy cream, 2 teaspoons vanilla extract
-
To assemble: Trim the top of the cake layers and brush with 1 tablespoon of syrup. On the bottom layer, pipe a border of frosting around the edge, fill the center with half of the blueberry filling, and place the second cake layer upside down on top. Use the rest of the frosting to cover the top and sides of the cake. Spoon the remaining blueberry filling on top and garnish with fresh berries.Fresh blueberries
Video
Notes
Refer to the “Storage, Freezing, and Make-Ahead Options” section above for detailed guidance on how to properly store, freeze, and prepare this cake in advance to ensure optimal freshness and flavor.
The calorie information provided for the recipe is an estimate. The accuracy of the calories listed is not guaranteed.
